Small Changes, Big Impact: App Mode 2.0's New Customization Features, Part 2


WRITTEN BY
Senior Solutions Architect
TABLE OF CONTENT
CAUTION
For security reasons, the ability to override default configurations should be carefully managed. Administrators should implement appropriate measures to prevent unauthorized changes.
NOTE
Since this is only for demonstration with dummy apps, you can create your physics PS1 file based loosely on this math.ps1 file
NOTE
Since this is only for demonstration with dummy apps, you can create your physics JSON file based loosely on this math.json file
In this follow-up post, we will delve deeper into the customization process, demonstrating how you can override the default layout and applications list for the Frame taskbar and how you can utilize this feature to significantly enhance end-user experiences.
Overriding the Default Layout and Application List
App Mode 2.0 enables administrators to make real-time adjustments to the default layout and application list inside the Frame Taskbar. By modifying a pre-session Frame Guest Agent (FGA) script, you can seamlessly override the default configuration to match individual user or group requirements.
You can completely transform the appearance and functionality of the Start menu by adding, removing, and modifying applications and folders. For instance, you may add a new application that an end-user requested during their session or remove an application that's no longer needed. The ability to modify applications and folders in real time empowers administrators with the ability to promptly cater to changing user needs.
Additionally, applications can be layered or virtualized during an active session based on user policy, thus enhancing the versatility of App Mode 2.0.
Let's look at a real-world example:
Scenario: Subject Switcher for a School’s Computer Lab
Let's imagine there is a high school computer lab that has a laptop/computer for any student who is present for any given period in a day. The teacher of this classroom has multiple periods per day that range in educational subjects including Math, Physics, History, Political Science, and more.
However, each subject has its own set of applications and folder structures which are tailored to the experience required for studying that particular subject. Instead of requiring the students to maneuver around in a large/confusing mess of folder structures, we want to be able to give them the option to switch between different contexts/layouts in the Frame Taskbar to match the class they're attending.
The options for how the end user could trigger the context/layout switch are virtually endless. You could have a custom web page built on top of Frame’s Session API, or even just a Windows application UI that is running in the workload VM. Many customers choose to use the pre-session FGA script to dynamically determine the layout of the Frame Taskbar menu, but we want to demonstrate a real-time process in this article.
To keep things simple with the “how”, we are going to script the Frame Taskbar itself to switch between the different layouts. We want to use the Frame Taskbar to act as a toggle or switch mechanism for adjusting the layout of the menu to match the subject context of the current class.
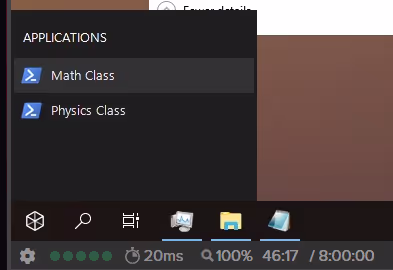
In the screenshot below, you can see what we are aiming to accomplish. We want the initial/default layout of the Frame Taskbar to present the students with a list of subjects to choose from:
To illustrate what happens when you choose a subject, the GIF below shows what the Frame Taskbar will immediately change to as soon as the “Math” subject was chosen in the menu.
Additionally, we want to make sure that when we choose a subject to switch to, there is an option at the bottom of the start menu that includes the ability to go back to the original menu to switch between all subjects. In the screenshot above, notice the “Back to main menu” option. When someone clicks on that, the initial/default layout menu will be displayed again. This acts as a sort of “Go back”, or “Go home” option.
Let’s lay out the steps for the workflow that we plan to cover. The scenario we will cover will look something like this:
- Session starts and the student will be presented with a Frame Taskbar configuration that we have chosen as the initial/default layout (List of all subjects to switch between).
- The teacher instructs the students to switch to the “Math” lab layout.
- The student clicks on the “Math” button, and the new layout for math-only applications is now automatically updated. (Note that the “Back to main menu” button is now available).
- When the student chooses the “Back to main menu” button, the original layout returns.
Here's what is happening behind the scenes:
During the pre-session start to the student session, an FGA Pre-Session pre-session.ps1 script executes and places the server_launchpad_override.json file into the C:\ProgramData\Nutanix\Frame\Config directory. The server_launchpad_override.json file includes the main/default menu layout. Each application on the menu is a Powershell script that replaces the server_launchpad_override.json file with one that is associated with the selected subject.
- The session starts for the end user.
- The end user chooses
Mathin the start menu layout. - The override JSON file is replaced with the
math.ps1(Which includes theBack to main menuapp) - The
Back to main menubutton points todefault-layout.ps1which is a script that replaces the override JSON file with the default layout again
To be clear, this workflow is one of many ways to handle this scenario. For this blog post, we wanted to provide a clear and concise demonstration of the feature that can be implemented with very minimal effort and documentation.
For this workflow to operate as expected, let's review the prerequisites:
Prerequisites
- Make sure the folder/directory
C:\ProgramData\Nutanix\Frame\FGA\Scripts\Userexists and thedefinition.ymlfile is setup to executepre-session.ps1(See here for more details on how to do this) - Inside the
C:\ProgramData\Nutanix\Frame\FGA\Scripts\Userdirectory, make suremath.ps1,physics.ps1, andback_to_main.ps1files exist in here (based on the code below) - In the
C:\ProgramData\Nutanix\Frame\Configdirectory, make sure themain.json,math.json, andphysics.jsonfiles exist (Based on the code below)
Code Examples
Back to Main
#Toggle the files
$filePath1 = "C:\ProgramData\Nutanix\Frame\Config\main.json"
$filePath2 = "C:\ProgramData\Nutanix\Frame\Config\server_launchpad_override.json"

#Force an overwrite of the override JSON
Copy-Item -Path $filePath1 -Destination $filePath2 -Force
Math and Physics PowerShell Code
#Toggle the files
$filePath1 = "C:\ProgramData\Nutanix\Frame\Config\math.json"
$filePath2 = "C:\ProgramData\Nutanix\Frame\Config\server_launchpad_override.json"

#Overwrite the file
Copy-Item -Path $filePath1 -Destination $filePath2 -Force
Server launchpad override -- main.json (Used in Pre-Session script, or placed by Sandbox as server_launchpad_override.json)
{
  "name": "root",
  "order": 0,
  "applications": [
    {
      "name": "Math Class",
      "path": "C:\\Windows\\System32\\WindowsPowerShell\\v1.0\\powershell.exe",
      "arguments": "C:/ProgramData/Nutanix/Frame/FGA/Scripts/User/math.ps1",
      "order": 1
    },
    {
      "name": "Physics Class",
      "path": "C:\\Windows\\System32\\WindowsPowerShell\\v1.0\\powershell.exe",
      "arguments": "C:/ProgramData/Nutanix/Frame/FGA/Scripts/User/physics.ps1",
      "order": 1
    }
  ],
  "folders": []
}math.json Contents
{
  "name": "root",
  "order": 0,
  "applications": [
    {
      "name": "Math Application 1",
      "path": "Z:\\Autoruns64.exe",
      "icon_url": "",
      "order": 0
    },
    {
      "name": "Another Math App",
      "path": "C:\\Windows\\System32\\taskmgr.exe",
      "icon_url": "https://images.freeimages.com/fic/images/icons/2794/metro_ui/512/command_prompt.png",
      "order": 1
    },
    {
      "name": "Back to Main",
      "path": "C:\\Windows\\System32\\WindowsPowerShell\\v1.0\\powershell.exe",
      "arguments": "C:/ProgramData/Nutanix/Frame/FGA/Scripts/User/back_to_main.ps1",
      "order": 2
    }
  ],
  "folders": []
}Once these files are in place on the Sandbox, you can publish into production and test the results in an App Mode 2.0 enabled Launchpad.
Conclusion
With the implementation of App Mode 2.0, Frame has taken another giant step towards improving and personalizing end-user experiences. By enabling administrators to customize user interfaces, including the ability to dynamically modify the Start menu and application list, App Mode 2.0 provides the flexibility necessary for today's diverse and rapidly-changing work environments.
As we continue to develop and refine Frame, we'll focus on introducing more dynamic customization options to further enhance end-user experiences and meet our customers' evolving needs.
Stay tuned for future updates, as we explore more features and provide more in-depth tutorials on how to get the most out of Frame. Remember, small changes can indeed have a big impact!
Interested in other Admin API blog posts? Click here!
Contact Us
Need help with your Frame deployment, have an idea for a new use case, or just want to learn more about Frame?
Email us at frame-sales@dizzion.com and one of our experts will reach out!
About the Author

Dizzion provides secure, high-performance digital workspaces that enable organizations to support teams anywhere. Our platform blends enterprise-grade security, compliance, and performance with flexible deployment options including AWS, Microsoft Azure, Google Cloud, IBM Cloud VPC, Nutanix on-premises, or hybrid models. Founded in 2011 and headquartered in San Antonio, Texas, Dizzion serves customers across multiple industries from healthcare and finance to education and government. For more information, visit www.dizzion.com.
Senior Solutions Architect
Justin Emilio is a Senior Solutions Architect with Frame.
Subscribe to our newsletter
Register for our newsletter now to unlock the full potential of Dizzion's Resource Library. Don't miss out on the latest industry insights – sign up today!

Dizzion values your privacy. By completing this form, you agree to the processing of your personal data in the manner indicated in the Dizzion Privacy Policy and consent to receive communications from Dizzion about our products, services, and events.